通过Wazuh实现漏洞扫描
Wazuh是个复杂的积木式系统,由ossec、ElasticStack和wazuh插件以及第三方的漏扫、病毒查杀、文件监控等等安全工具组合而成。本文将简述Wazuh的漏洞扫描模块的使用。
应用原理
- Wazuh不是一个漏洞扫描工具,它只是借助本身的功能模块来实现对操作系统的漏洞监控;
- Wazuh的漏扫依赖于Agent的对系统软件版本的扫描,上传至Master节点之后,通过在线或者离线加载的各个操作系统官方发布的CVE数据库以及美国政府发布的NVD数据库来进行对比,从而实现漏洞的检查和告警;
- Wazuh不使用爬虫、端口扫描等传统漏扫技术路径,所以对客户端主机的性能影响极小;
- Wazuh官方支持对数据库、中间件等软件进行漏洞扫描,但只支持操作系统发行官方库中的包,因为它是简单的按照软件包名来进行对比的;
5。 Wazuh可以对接Clamav、Suricata等其他安全系统。
漏洞扫描模块
- 配置离线文件
在wazuh-master上安装Nginx |
- 配置漏洞扫描模块
vim /var/ossec/etc/ossec.conf
<vulnerability-detector> |
- 配置定期更新漏洞文件
|
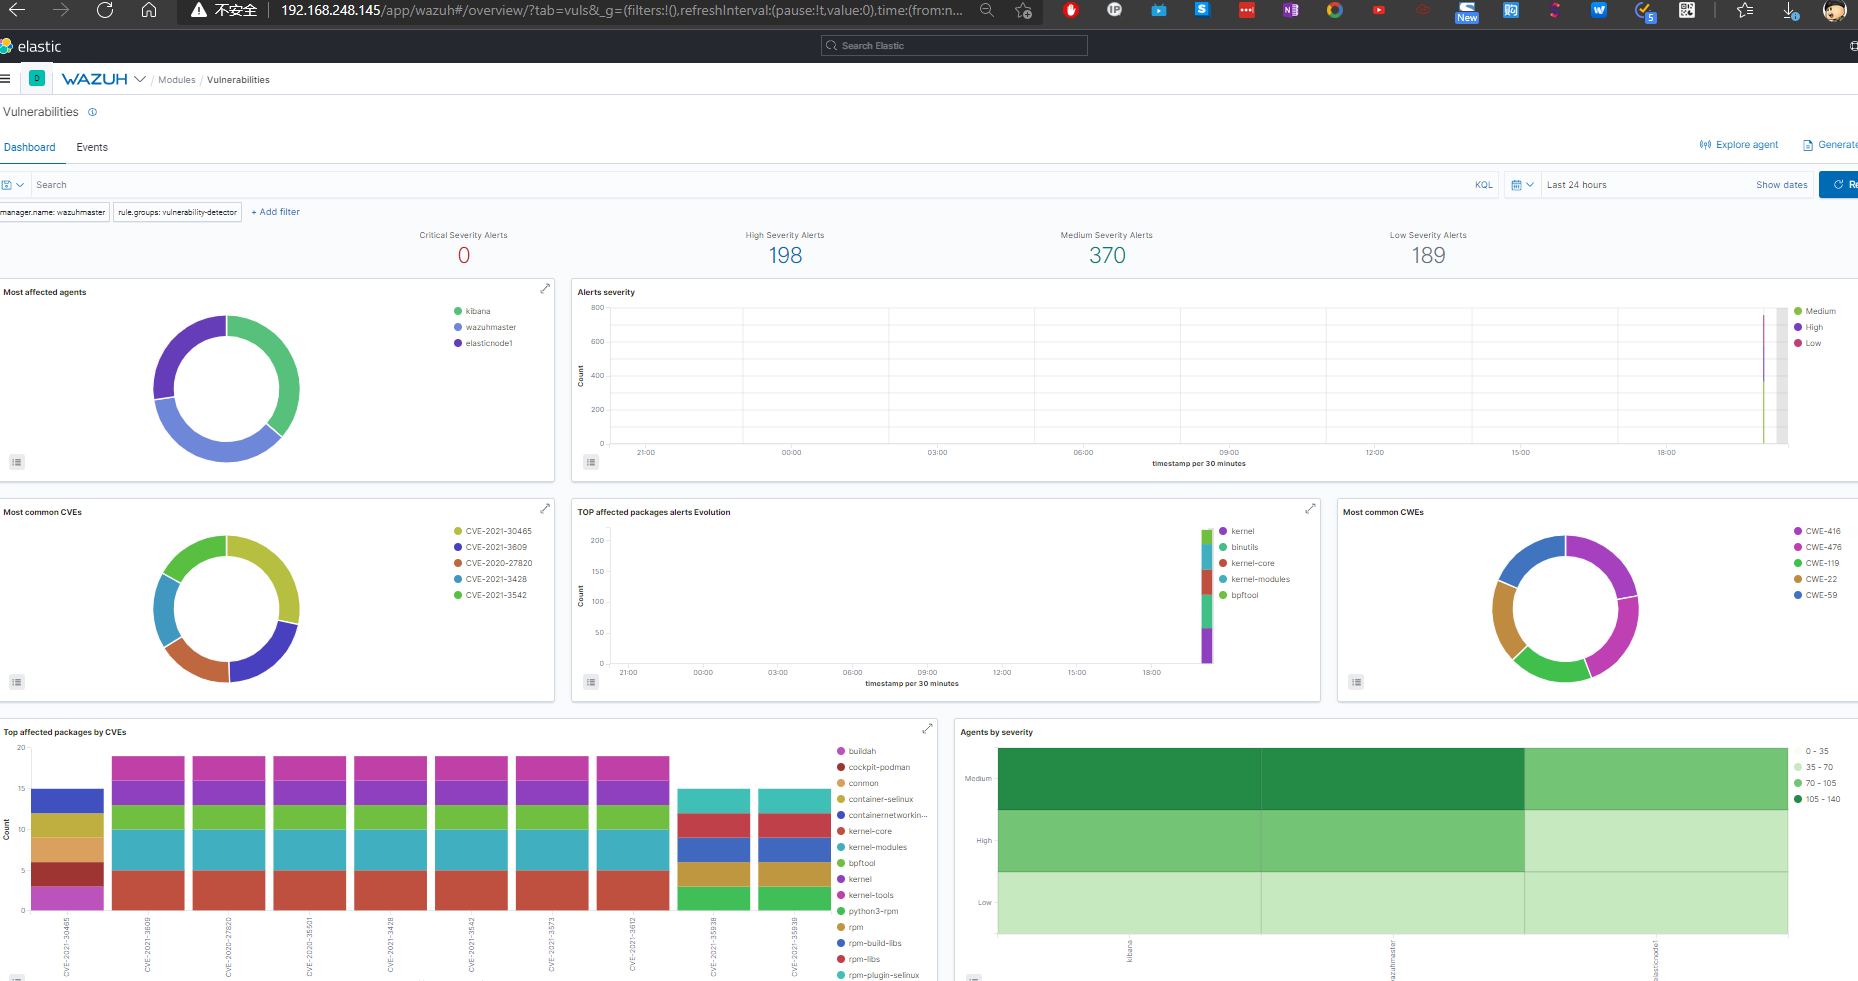
- 查询漏扫情况
邮件告警
开启全局邮件通知
Wazuh本身没有邮件功能,它依赖系统的邮件投递
<global>
<email_notification>yes</email_notification>
<email_to>sujx@live.cn</email_to>
<smtp_server>exmail.qq.com</smtp_server>
<email_from>i@sujx.net</email_from>
<email_maxperhour>12</email_maxperhour>
</global>
定义邮件告警级别,设定事件级别>=12级即发送邮件告警
<alerts>
<log_alert_level>3</log_alert_level>
<email_alert_level>12</email_alert_level>
</alerts>
定义每日高危漏洞通知( >=13级漏洞 )
<reports>
<level>13</level>
<title>Daily report: Alerts with level higher than 13</title>
<email_to>sujx@live.cn</email_to>
</reports>
强制发送告警邮件,即不管上述如何设定一定要发邮件告警,是配置在rule上,而不是全局conf中
<rule id="502" level="3">
<if_sid>500</if_sid>
<options>alert_by_email</options>
<match>Ossec started</match>
<description>Ossec server started.</description>
</rule>邮件投递
yum install -y mailx
使用mailx发送内部邮件
cat >> /etc/mail.rc<<EOF
设定内部匿名邮件服务器
set smtp=smtp.example.com
EOF
使用公共邮箱发送邮件
yum install -y postfix mailx cyrus-sasl cyrus-sasl-plain
建立邮件中继
cat >> /etc/postfix/main.cf<<EOF
relayhost = [smtp.exmail.qq.com]:587
smtp_sasl_auth_enable = yes
smtp_sasl_password_maps = hash:/etc/postfix/sasl_passwd
smtp_sasl_security_options = noanonymous
smtp_tls_CAfile = /etc/ssl/certs/ca-bundle.crt
smtp_use_tls = yes
EOF
设定使用i@sujx.net发送邮件给指定接收方
echo [smtp.exmail.qq.com]:587 i@sujx.net:PASSWORD > /etc/postfix/sasl_passwd
postmap /etc/postfix/sasl_passwd
chmod 400 /etc/postfix/sasl_passwd
chown root:root /etc/postfix/sasl_passwd /etc/postfix/sasl_passwd.db
chmod 0600 /etc/postfix/sasl_passwd /etc/postfix/sasl_passwd.db
重置服务
systemctl reload postfix
邮件测试
echo "Test mail from postfix" | mail -s "Test Postfix" -r "i@sujx.net" sujx@live.cn
邮件告警
Wazuh Notification.
2021 Jul 03 23:21:09
Received From: ( server002. sujx.net ) any->syscheck
Rule: 550 fired ( level 7 ) -> "Integrity checksum changed."
Portion of the log( s ):
File '/etc/sysconfig/iptables.save' modified
Mode: scheduled
Changed attributes: mtime, md5, sha1, sha256
…………
--END OF NOTIFICATION
邮件报告
Report 'Daily report: Alerts with level higher than 13.' completed.
------------------------------------------------
Processed alerts: 481384
Post-filtering alerts: 1953
First alert: 2021 Jun 29 00:06:08
Last alert: 2021 Jun 29 23:59:17
Top entries for 'Level':
------------------------------------------------
Severity 13 |1953 |
Top entries for 'Group':
------------------------------------------------
gdpr_IV_35. 7. d |1953 |
pci_dss_11. 2. 1 |1953 |
pci_dss_11. 2. 3 |1953 |
tsc_CC7. 1 |1953 |
tsc_CC7. 2 |1953 |
vulnerability-detector |1953 |
Top entries for 'Location':
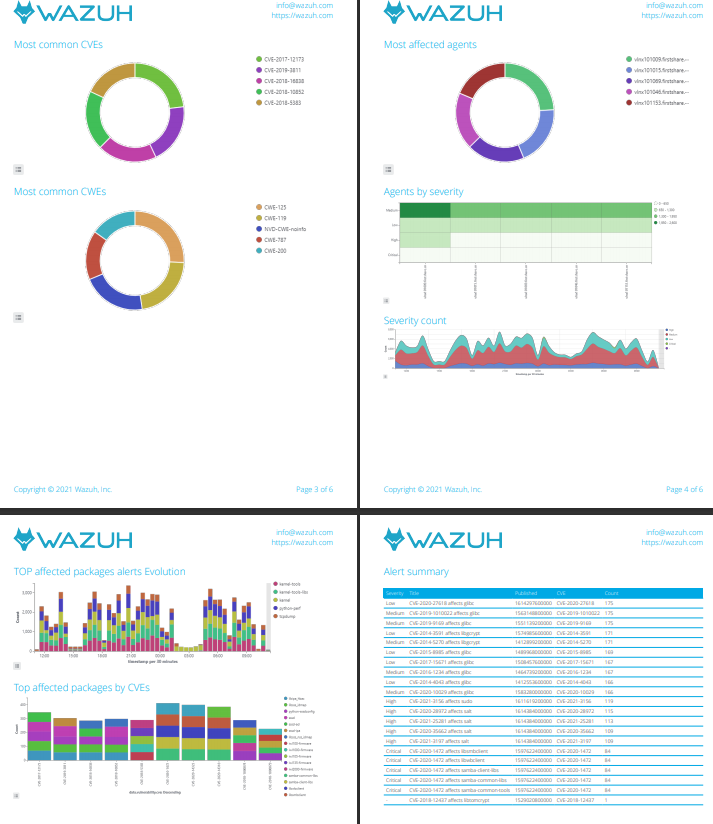
……使用Kibana产生PDF版本的漏洞报告

生产建议
1。 由于Wazuh的漏扫模块很容易将CPU资源打满,建议使用wazuh的群集模式部署相应数量的worker来承担漏扫功能。
2。 Wazuh的worker建议使用4核4G的配置进行部署,其内存占用2G左右,但CPU占用较高,且多核性能不理想。官方回复是以后版本会改进。
3。 如果要求每天( 24hour )产生一次全网漏扫报告的话,建议使用200:1的比例部署worker。
- 微信

相关推荐
2021-07-06
Wazuh的基本部署
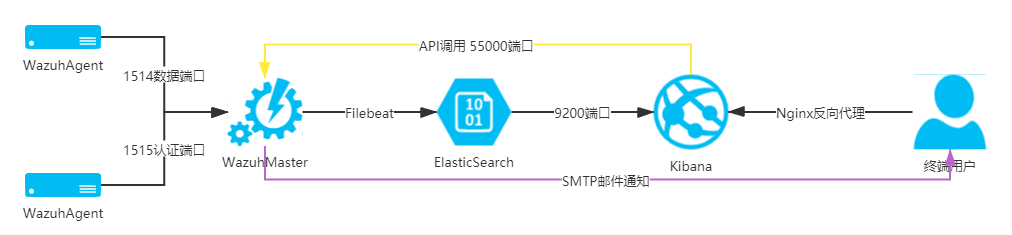
本次将部署一套分布式Wazuh方案,实现其基本功能。其中: wazuh-master启用全功能组件; ElasticStack将使用官方基本授权,不启用X-pack和加密连接; Linux版本Agent将安装到Kibana主机和ElasticSearch主机上,不再额外安装示例主机; 各个功能组件采用单节点部署;5。 Wazuh使用4。 1。 5版本,搭配官方指定7。 11。 2ElasticStack版本。 部署方案 部署拓扑 网络地址 系统角色 版本 网络地址 ElasticSearch 7. 11. 2 192. 168. 248. 146 Kibana 7. 11. 2 192. 168. 248. 145 WazuhMaster 4. 1. 5 192. 168. 248. 150 WazuhAgent 4. 1. 5 192. 168. 248. 1 部署实施 ElasticSearch的安装 # 安装前置软件yum install -y zip unzip curl# 导入秘钥rpm --import https://ar...

2021-08-01
Wazuh系统的群集化改造
综述在中大型网络环境中,单台Allinone的Wazuh系统或者单节点的分布式部署Wazuh系统从性能上已经无法满足日志分析和漏洞扫描的需求,因此应当采用高可用、多节点的分布式部署来满足Wazuh对CPU和存储的要求。 序号 系统描述 配置 网络地址 系统角色 1 Lvsnode1 1c/1g 192. 168. 79. 51 LVS+KeepLived 提供VIP和负载均衡 2 Lvsnode2 1c/1g 192. 168. 79. 52 LVS+KeepLived 提供VIP和负载均衡 3 Wazuhnode0 2c/2g 192. 168. 79. 60 Wazuh主节点,提供认证以及cve库 4 Wazuhnode1 1c/1g 192. 168. 79. 61 WazuhWorker,工作节点,提供事件日志分析和漏洞扫描 5 Wazuhnode2 1c/1g 192. 168. 79. 62 WazuhWorker,工作节点,提供事件日志分析和漏洞扫描 6 KibanaNode 2c&#...
2021-07-05
终端安全系统WAZUH的介绍
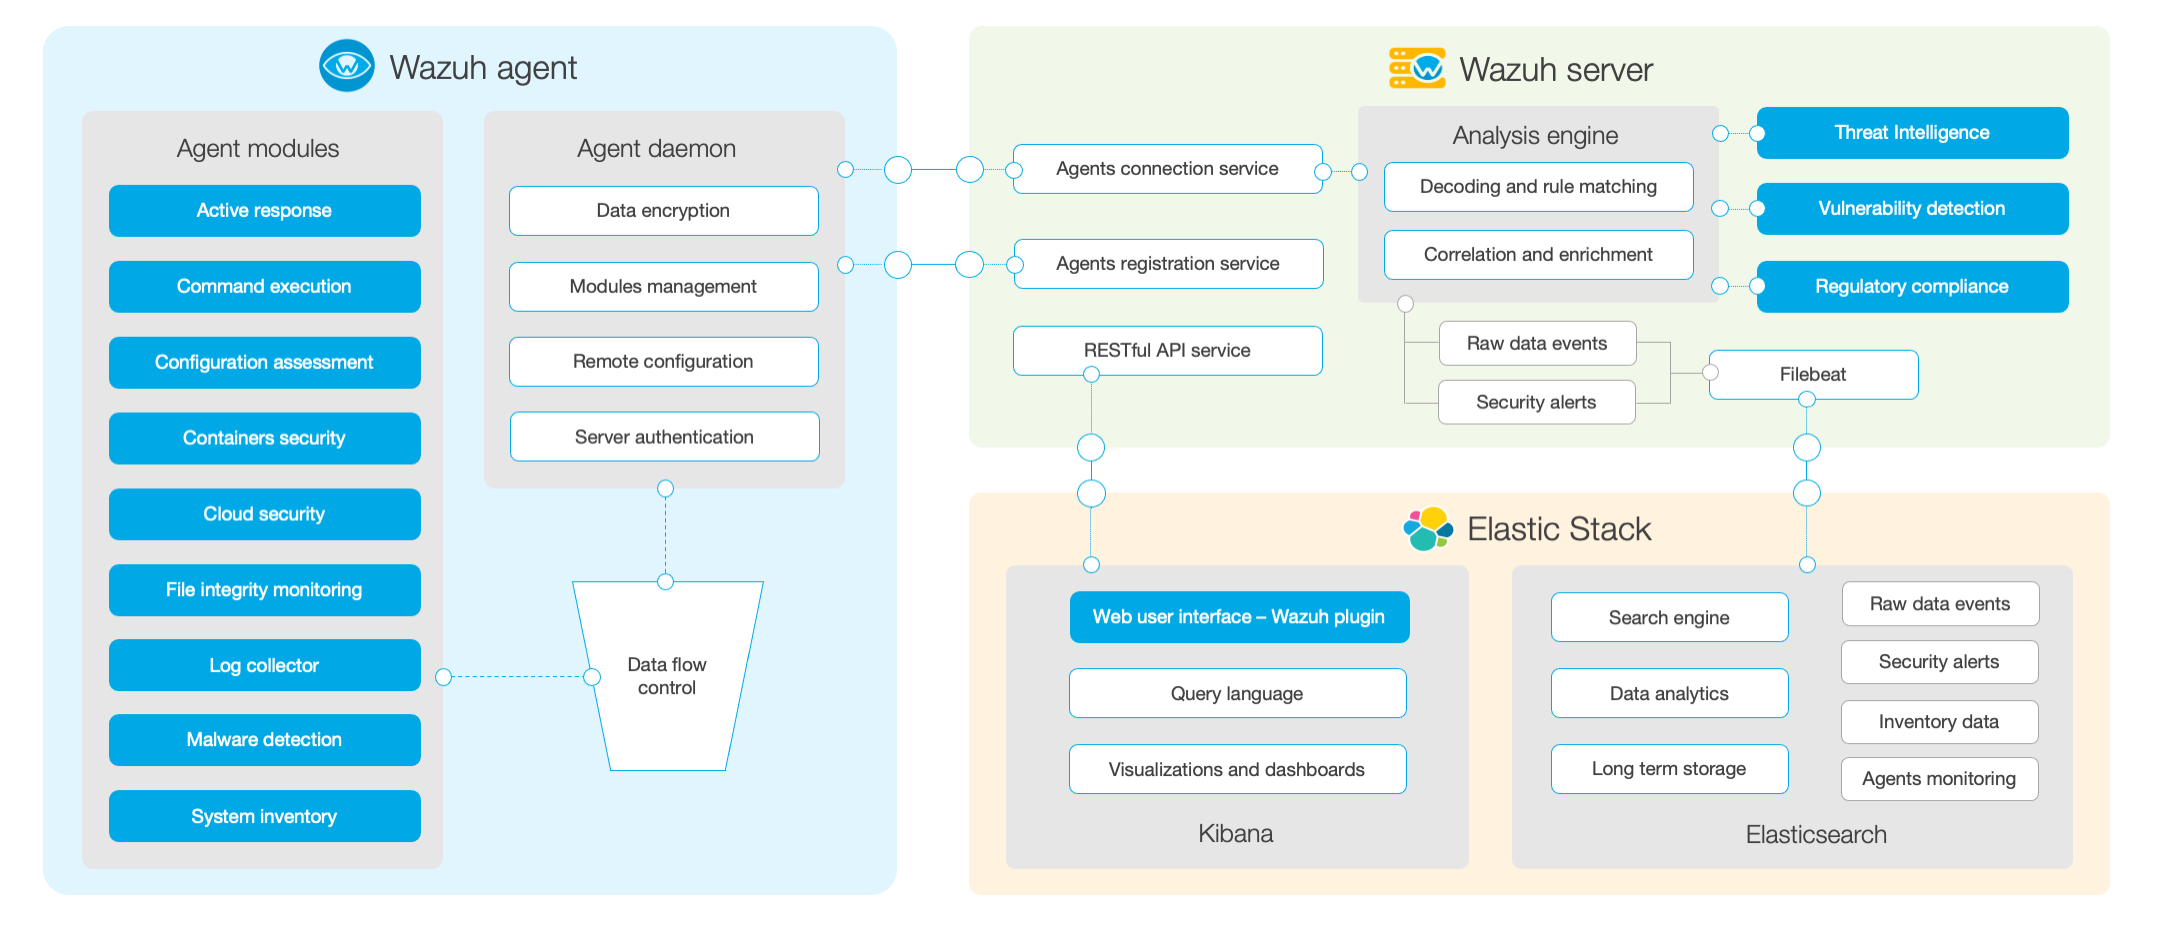
简介[Wazuh]( Wazuh · The Open Source Security Platform)是一整套基于ossec安全检测工具和EFK日志工具构成的终端安全管理工具。不管是将其分类至HIDS,还是EDR,它都是一套通过监控主机日志行为,提供安全检测、分析和完整报告的开源、免费利器。Wazuh基于C/S架构,它的Agent支持Windows、MacOS、Linux、HP-UX、AIX等主流操作系统。其服务端负责提供认证和数据收集,然后通过filebeat进行日志清洗,最后导入ElasticSearch,通过Kinbana进行展示和输出日志。它不仅可以收集主机的事件日志进行一般的入侵检测功能,还可以通过第三方提供的系统漏洞检测feed文件,来实现主机的漏洞扫描和合规检查。 功能示例 组件模块Wazuh的组件分为三部分: 客户端的功能 收集日志和事件日志; 文件和注册表的监控; 运行进程和安装软件的信息收集; 监控系统端口和网络配置; 检测恶意软件; 配置管理和策略监控 检测主机响应 服务端 客户端的服务器注册; 实现客户端的连接服务; 根据各项...

2023-08-01
社会工程概论
Christopher J. Hadnagy ,任social-engineer公司CEO, 著名安全专家。其长期经营Podcast( 托管于Apple iTunes )的已有国内非官方镜像 基本概念概述 社会工程利用的正是别人的性别偏见、种族偏见、年龄偏见和现状偏见; 任意一种能影响某人采取可能符合或者不符合其最大利益行动的行为,称为社会工程; 社会工程的核心是诱导 社会工程的生理基础: 多巴胺:使人感到愉快、幸福和收到鼓舞的化学物质; 催产素:信任别人或者被别人信任时产生的激素; 大脑的α模式:大脑处于8~13Hz的“白日梦”运动状态; 社会工程的四个攻击向量: 短信诈骗 电信诈骗 网络诈骗 冒充 组合攻击 社会工程金字塔OSINT——设计伪装——规划攻击——发起攻击——汇报 OSINTOSINT意为开源情报,是社工的命脉,是每次行动的出发点和支撑点。 OSINT示例企业 该公司如何使用互联网 该公司如何使用社交媒体 该公司员工可以在互联网上发布什么样的信息,是否由相关政策规定 有多少个供应商 如何收款 如何付款 是否设立客服中心 该公司总部、客服中心或其他分...

2021-08-05
批量更新Wazuh主机配置文件和漏洞库
批量更新Wazuh主机配置文件和漏洞库综述相比较单机版本,群集化的Wazuh需要处理的第一个问题就是如何保证ossec。 conf文件和漏洞库的统一配置、统一更新、统一下发。以下将使用简单的Ansible命令和Shell脚本实现前述功能。 07 摄于天津北辰·天津西站 建立共享 部署Nginx # 在wazuh-master上安装Nginxyum install -y nginxmkdir -p /var/www/wazuhchown -R nginx:nginx /var/www/wazuh 下载更新 # 下载离线文件cd /var/www/wazuh/# 下载Ubuntu 20. 04的漏洞种子wget -N https://people.canonical.com/~ubuntu-security/oval/com.ubuntu.focal.cve.oval.xml.bz2# 下载RHEL 7 8的漏洞种子文件wget https://www.redhat.com/security/data/oval/v2/RHEL6/rhel-6-including-unpat...

2025-03-01
KALI的初步
Kali是世界安全及渗透行业公认的网络安全审计工具集合,被广泛用来进行设备、系统及网络的安全性测试和审计。其所包含的测试工具之多、功能只强大,几乎可以用来进行各种安全升级工作。对于目前网络及系统产生或存在的安全问题,如查找系统弱点、安全漏洞、技术缺陷等,都可以完美胜任。 02 广东·东莞·三丫坡·华为员工培训中心 渗透测试概述渗透测试渗透一般是指网络渗透。网络渗透是攻击者常用的一种攻击手段,也是一种综合的高级攻击技术,是对网络主机或网络服务器群组采用的一种迂回渐进的攻击方式,通过长期而有计划的逐步渗透攻击进入网络,最终完全控制整个网络。整个过程包括对系统的弱点、技术缺陷或漏洞的主动分析。渗透测试与其他评估方法不同。通常的评估方法是根据已知信息资源或者其他被评估对象去发现所有相关的安全问题。渗透测试是根据已知可利用的安全漏洞,去发现是否存在相应的信息资源。渗透测试更注重安全漏洞的严重性。 常见工具类型 网络渗透测试工具 Web应用程序渗透测试工具 数据库渗透测试工具 自动化渗透测试工具 常见工具 NAMP Metasloit Wireshark Burp Suite SQ...