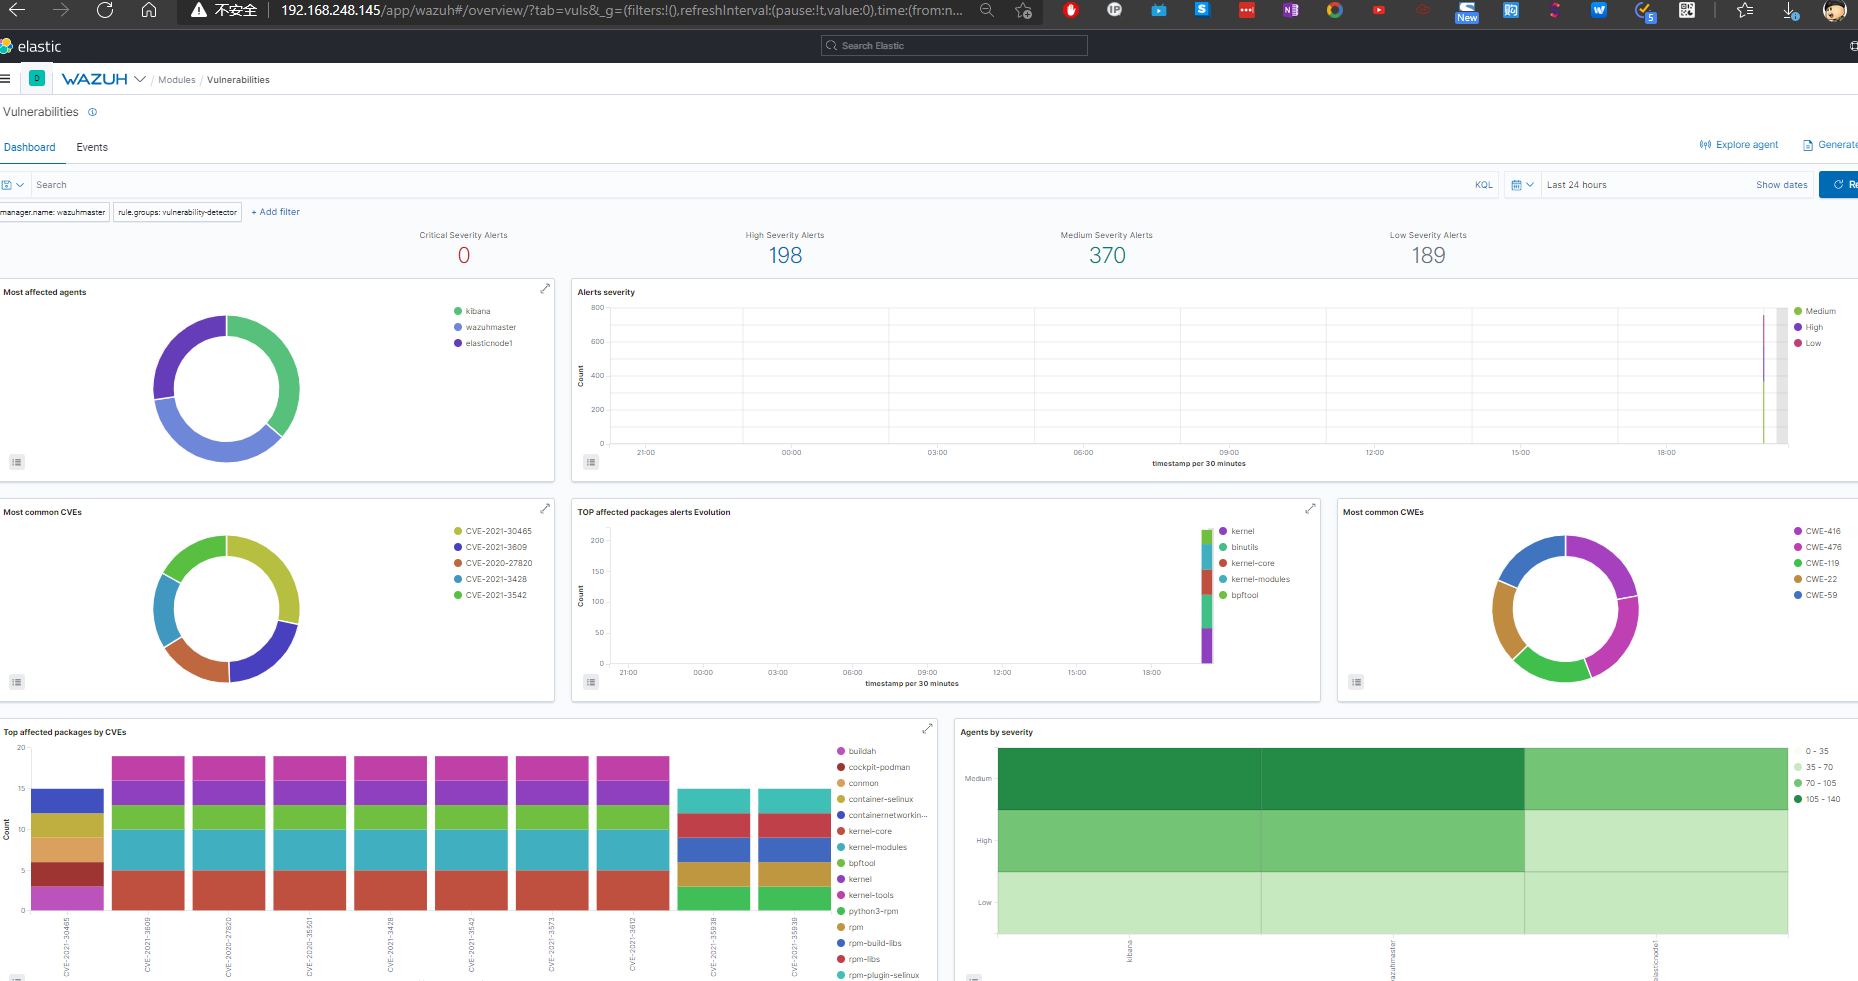
通过Wazuh实现漏洞扫描
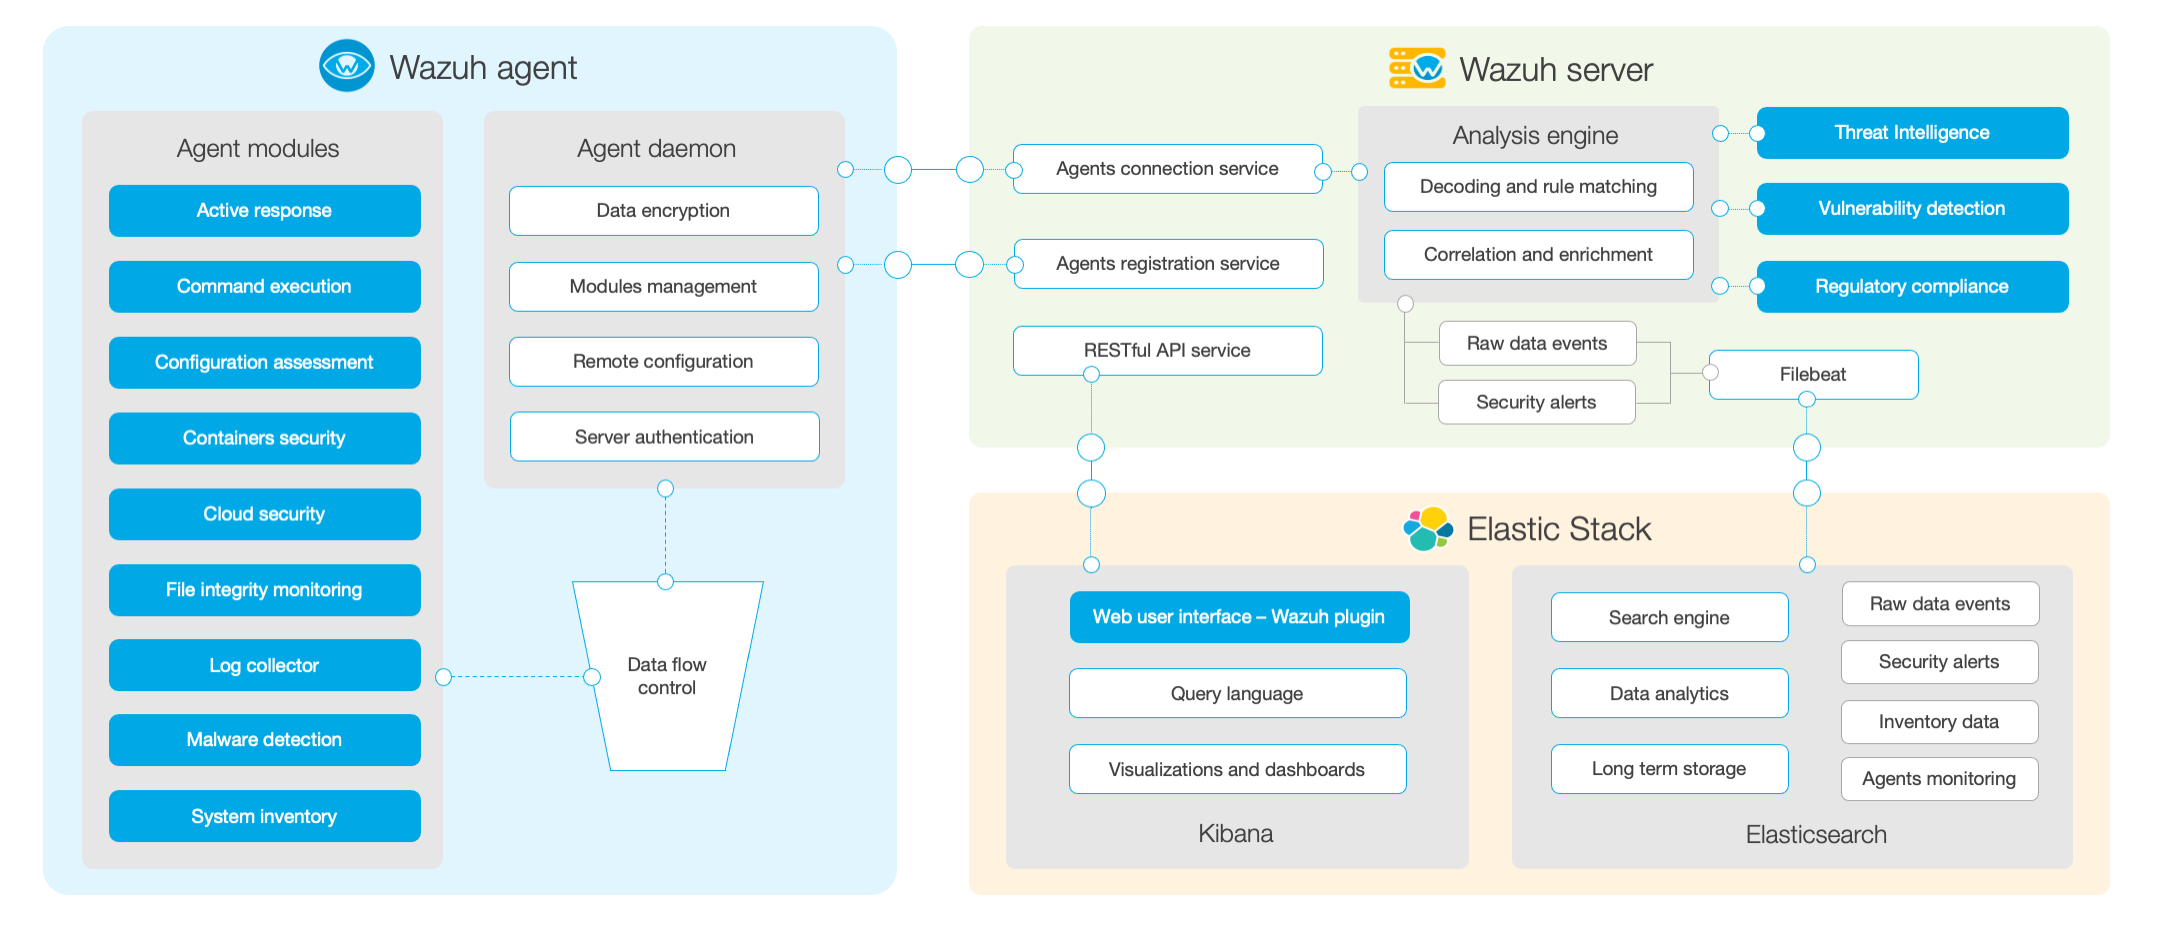
Wazuh是个复杂的积木式系统,由ossec、ElasticStack和wazuh插件以及第三方的漏扫、病毒查杀、文件监控等等安全工具组合而成。本文将简述Wazuh的漏洞扫描模块的使用。
应用原理
- Wazuh不是一个漏洞扫描工具,它只是借助本身的功能模块来实现对操作系统的漏洞监控;
- Wazuh的漏扫依赖于Agent的对系统软件版本的扫描,上传至Master节点之后,通过在线或者离线加载的各个操作系统官方发布的CVE数据库以及美国政府发布的NVD数据库来进行对比,从而实现漏洞的检查和告警;
- Wazuh不使用爬虫、端口扫描等传统漏扫技术路径,所以对客户端主机的性能影响极小;
- Wazuh官方支持对数据库、中间件等软件进行漏洞扫描,但只支持操作系统发行官方库中的包,因为它是简单的按照软件包名来进行对比的;
- Wazuh可以对接Clamav、Suricata等其他安全系统。
漏洞扫描模块
- 配置离线文件
1
2
3
4
5
6
7
8
9
10
11
12
13
14
15
16
17
18
19
20
21
22
23
24
25
26
27
28
29
30
31
32
33
34
35
36在wazuh-master上安装Nginx
yum install -y nginx
mkdir -p /var/www/wazuh/os
chown -R nginx:nginx /var/www/wazuh
下载离线文件
cd /var/www/wazuh/
下载RHEL 7 8的漏洞种子文件
wget https://www.redhat.com/security/data/oval/v2/RHEL7/rhel-7-including-unpatched.oval.xml.bz2
wget https://www.redhat.com/security/data/oval/v2/RHEL8/rhel-8-including-unpatched.oval.xml.bz2
下载微软漏洞文件
wget https://feed.wazuh.com/vulnerability-detector/windows/msu-updates.json.gz
下载Redhat的安全数据Json文件
wget https://raw.githubusercontent.com/wazuh/wazuh/master/tools/vulnerability-detector/rh-generator.sh
chmod +x ./*.sh
mkdir redhat
./rh-generator.sh redhat/
下载NVD的安全数据库(CVE)
wget https://raw.githubusercontent.com/wazuh/wazuh/master/tools/vulnerability-detector/nvd-generator.sh
chmod +x ./*.sh
mkdir nvd
./nvd-generator.sh 2010 nvd/
配置nginx文件
vim /etc/nginx/nginx.conf
在server{}中修改增补如下配置
root /var/www/wazuh;
location / {
autoindex on;
autoindex_exact_size off;
autoindex_localtime on;
} - 配置漏洞扫描模块
vim /var/ossec/etc/ossec.conf1
2
3
4
5
6
7
8
9
10
11
12
13
14
15
16
17
18
19
20
21
22
23
24
25
26
27
28
29
30<vulnerability-detector>
<enabled>yes</enabled>
<interval>5m</interval>
<ignore_time>6h</ignore_time>
<run_on_start>yes</run_on_start>
<!-- RedHat OS vulnerabilities -->
<provider name="redhat">
<enabled>yes</enabled>
<os url="http://192.168.248.150/rhel-7-including-unpatched.oval.xml.bz2">7</os>
<os url="http://192.168.248.150/rhel-8-including-unpatched.oval.xml.bz2">8</os>
<url start="1" end="25">http://192.168.248.150/redhat/redhat-feed[-].json</url>
<update_interval>1h</update_interval>
</provider>
<!-- Windows OS vulnerabilities -->
<provider name="msu">
<enabled>yes</enabled>
<url>http://192.168.248.150/msu-updates.json.gz</url>
<update_interval>1h</update_interval>
</provider>
<!-- Aggregate vulnerabilities -->
<provider name="nvd">
<enabled>yes</enabled>
<url start="2010" end="2021">http://192.168.248.150/nvd/nvd-feed[-].json.gz</url>
<update_interval>1h</update_interval>
</provider>
</vulnerability-detector> - 配置定期更新漏洞文件
1
2
3
4
5
6
7
8
9
10
11
12
13
14
15
16
17
18
19
20
21
22
23
24
25
cd /var/www/wazuh/
# 下载Ubuntu 20.04的漏洞种子
wget -N https://people.canonical.com/~ubuntu-security/oval/com.ubuntu.focal.cve.oval.xml.bz2
# 下载RHEL 6/7/8的漏洞种子
wget -N https://www.redhat.com/security/data/oval/v2/RHEL6/rhel-6-including-unpatched.oval.xml.bz2
wget -N https://www.redhat.com/security/data/oval/v2/RHEL7/rhel-7-including-unpatched.oval.xml.bz2
wget -N https://www.redhat.com/security/data/oval/v2/RHEL8/rhel-8-including-unpatched.oval.xml.bz2
# 下载微软漏洞文件
wget -N https://feed.wazuh.com/vulnerability-detector/windows/msu-updates.json.gz
#下载Redhat的安全数据Json文件
/bin/bash /var/www/wazuh/rh-generator.sh /var/www/wazuh/redhat
# 下载NVD的安全数据库(CVE)
/bin/bash /var/www/wazuh/nvd-generator.sh 2010 /var/www/wazuh/nvd
# 更新文件权限
chown -R nginx:nginx /var/www/wazuh
# 重启服务,更新数据库
systemctl restart wazuh-manager.service - 查询漏扫情况
邮件告警
1
2
3
4
5
6
7
8
9
10
11
12
13
14
15
16
17
18
19
20
21
22
23
24
25
26
27
28
29
30开启全局邮件通知
Wazuh本身没有邮件功能,它依赖系统的邮件投递
<global>
<email_notification>yes</email_notification>
<email_to>sujx@live.cn</email_to>
<smtp_server>exmail.qq.com</smtp_server>
<email_from>i@sujx.net</email_from>
<email_maxperhour>12</email_maxperhour>
</global>
定义邮件告警级别,设定事件级别>=12级即发送邮件告警
<alerts>
<log_alert_level>3</log_alert_level>
<email_alert_level>12</email_alert_level>
</alerts>
定义每日高危漏洞通知(>=13级漏洞)
<reports>
<level>13</level>
<title>Daily report: Alerts with level higher than 13</title>
<email_to>sujx@live.cn</email_to>
</reports>
强制发送告警邮件,即不管上述如何设定一定要发邮件告警,是配置在rule上,而不是全局conf中
<rule id="502" level="3">
<if_sid>500</if_sid>
<options>alert_by_email</options>
<match>Ossec started</match>
<description>Ossec server started.</description>
</rule>邮件投递
1
2
3
4
5
6
7
8
9
10
11
12
13
14
15
16
17
18
19
20
21
22
23
24
25
26
27
28
29
30
31
32
33
34
35
36
37
38
39
40
41
42
43
44
45
46
47
48
49
50
51
52
53
54
55
56
57
58
59
60
61
62
63
64
65
66
67yum install -y mailx
使用mailx发送内部邮件
cat >> /etc/mail.rc<<EOF
设定内部匿名邮件服务器
set smtp=smtp.example.com
EOF
使用公共邮箱发送邮件
yum install -y postfix mailx cyrus-sasl cyrus-sasl-plain
建立邮件中继
cat >> /etc/postfix/main.cf<<EOF
relayhost = [smtp.exmail.qq.com]:587
smtp_sasl_auth_enable = yes
smtp_sasl_password_maps = hash:/etc/postfix/sasl_passwd
smtp_sasl_security_options = noanonymous
smtp_tls_CAfile = /etc/ssl/certs/ca-bundle.crt
smtp_use_tls = yes
EOF
设定使用i@sujx.net发送邮件给指定接收方
echo [smtp.exmail.qq.com]:587 i@sujx.net:PASSWORD > /etc/postfix/sasl_passwd
postmap /etc/postfix/sasl_passwd
chmod 400 /etc/postfix/sasl_passwd
chown root:root /etc/postfix/sasl_passwd /etc/postfix/sasl_passwd.db
chmod 0600 /etc/postfix/sasl_passwd /etc/postfix/sasl_passwd.db
重置服务
systemctl reload postfix
邮件测试
echo "Test mail from postfix" | mail -s "Test Postfix" -r "i@sujx.net" sujx@live.cn
邮件告警
Wazuh Notification.
2021 Jul 03 23:21:09
Received From: (server002.sujx.net) any->syscheck
Rule: 550 fired (level 7) -> "Integrity checksum changed."
Portion of the log(s):
File '/etc/sysconfig/iptables.save' modified
Mode: scheduled
Changed attributes: mtime,md5,sha1,sha256
…………
--END OF NOTIFICATION
邮件报告
Report 'Daily report: Alerts with level higher than 13.' completed.
------------------------------------------------
Processed alerts: 481384
Post-filtering alerts: 1953
First alert: 2021 Jun 29 00:06:08
Last alert: 2021 Jun 29 23:59:17
Top entries for 'Level':
------------------------------------------------
Severity 13 |1953 |
Top entries for 'Group':
------------------------------------------------
gdpr_IV_35.7.d |1953 |
pci_dss_11.2.1 |1953 |
pci_dss_11.2.3 |1953 |
tsc_CC7.1 |1953 |
tsc_CC7.2 |1953 |
vulnerability-detector |1953 |
Top entries for 'Location':
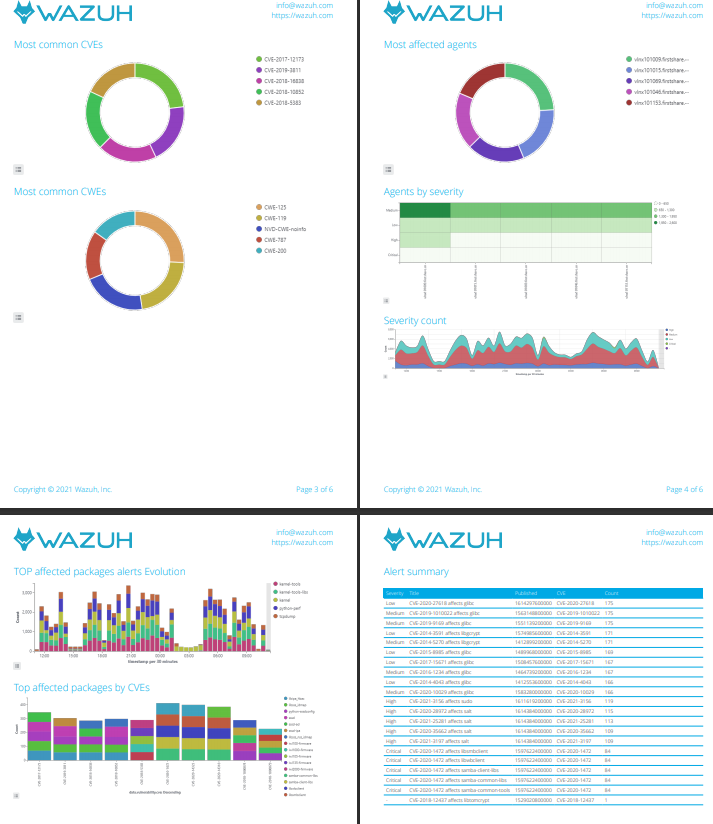
……使用Kibana产生PDF版本的漏洞报告
生产建议
- 由于Wazuh的漏扫模块很容易将CPU资源打满,建议使用wazuh的群集模式部署相应数量的worker来承担漏扫功能。
- Wazuh的worker建议使用4核4G的配置进行部署,其内存占用2G左右,但CPU占用较高,且多核性能不理想。官方回复是以后版本会改进。
- 如果要求每天(24hour)产生一次全网漏扫报告的话,建议使用200:1的比例部署worker。
All articles on this blog are licensed under CC BY-NC-SA 4.0 unless otherwise stated.


